I agree on both Mark! Fabulous photo of folks who get into the spirit of things.
Just as a side note, the image is a great opportunity to practice removing the background distractions to make it like a studio portrait.
I Shoot A Canon Web: isacimages.com / My Gear / Flickr Photostream I just fired myself from cleaning my house.
I don't like my attitude and I caught myself drinking on the job.
This is what I mean by replacing the background. I sent you a PSD file for you to play with.
I Shoot A Canon Web: isacimages.com / My Gear / Flickr Photostream I just fired myself from cleaning my house.
I don't like my attitude and I caught myself drinking on the job.
The brighter or washed out look was done to balance the light with the new background. Perhaps could have toned down the brightness a tad.
I always try to colour match the Foreground colours to the Background when I do composite work. Notice the colour shifts in the skin tones and the reds when the background images are changed.
Here's a few samples:
I Shoot A Canon Web: isacimages.com / My Gear / Flickr Photostream I just fired myself from cleaning my house.
I don't like my attitude and I caught myself drinking on the job.
You're welcome Mark. I'm glad you are learning a few tricks in PS. There's always help here if you need it. Very important to colour match the foreground to the background when doing composites. It's actually a very easy thing to do, I might do a tutorial on it.
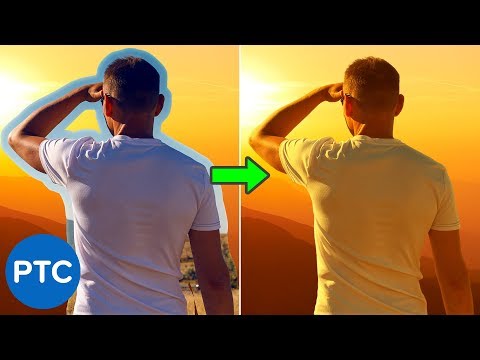
I was halfway through doing up my tutorial when I remembered seeing a Youtube video on it some time ago. It was by Jesus Ramirez from PTC. Might be easier to watch the tutorial rather than reading my effort. I use much the same method but sometimes prefer Enhance Per Channel Contrast (set to Color Mode) instead of Find Dark & Light Colors - depends on the image and how I interpret the preview.
I have an action I run, which creates the Curves layer, clips it to the image/mask layer, removes the curves mask which is not needed and then I just hold ALT and click AUTO on the curves properties, which opens the curves Auto Color Correction Options. It's then ready for me to select the dark and light colours from the background image. I hope it all works for you. I've sent the 2 images used in the tutorial and also a PSD with the masked image, ready for you to add the Curves Layer to make the adjustment.
Here's the tutorial:
I Shoot A Canon Web: isacimages.com / My Gear / Flickr Photostream I just fired myself from cleaning my house.
I don't like my attitude and I caught myself drinking on the job.
Thanks Isac, I will hve to study it and work out what I want out of it.
I don't really use PS a lot, but it has been interesting to do the biz with these photos I have taken. I will learn slowly, and so many thanks for your time and patience...
You're very welcome indeed Mark, it's always a pleasure to help out. Just let me know if I can be of any further help going forward. It won't be long when you are photographing something that you'll be saying to yourself, "that background is rubbish but I can easily fix that in Photoshop"!
 Tweet
Tweet


Comment